Phases of Clay: the process of transforming clay into ceramics
Clay is always changing. Before it becomes ceramic, it goes through several phases, some subtle, others irreversible, which result from the relationship between water, time and temperature.
From the plastic state to leather, from bone to shell to glazed ceramics, each phase changes the material. Each phase has different characteristics that define what can be done at that moment, and what cannot.
In this article you'll find a description of each stage of the process: characteristics, what to do, what to avoid, and how to recognize the right point.
⧗ reading time - 9 to 11 minutes ⧗
Clay, clay and ceramic paste?
Before we identify the phases of clay, it's useful to clarify a few terms. You may have heard different names for the raw material that, once fired, becomes ceramic. The most generic and traditional term in Portugal is clay, but in ceramics stores you'll often find clay or ceramic paste.
To clarify, we turn to the book Beginner's Guide to Ceramics, by Ana João Almeida, which identifies “clay” and distinguishes ceramic paste as the prepared, ready-to-use form we find in the store.
What is clay?
Ana João Almeida (2017). Handbook of Initiation to Ceramics. Author's edition/Oficinas do Convento
For a ceramist, this is a natural material which, when mixed with water, becomes a plastic paste and, when subjected to high temperatures, undergoes chemical transformations that give it a high degree of hardness and resistance.
A ceramic paste is the material that results from the treatment of one or more clays, which when mixed with water becomes plastic. In any type of clay we can remove elements or add elements. If we want a fine paste, we sieve or strain the clay to remove stones or other impurities; if we want to work with a stronger clay, we can add sand or another inert.
Ana João Almeida (2017). Handbook of Initiation to Ceramics. Author's edition/Oficinas do Convento
Ana João Almeida's book is a very complete handbook on ceramics and a must-read for anyone who wants to deepen their knowledge.
In ceramics workshops we work with factory-prepared ceramic paste, which guarantees consistency and stable, safe results. For the purposes of this article, we use the generic term clay, aware of the distinctions between clay, clay and ceramic paste.
How many stages does the clay have?
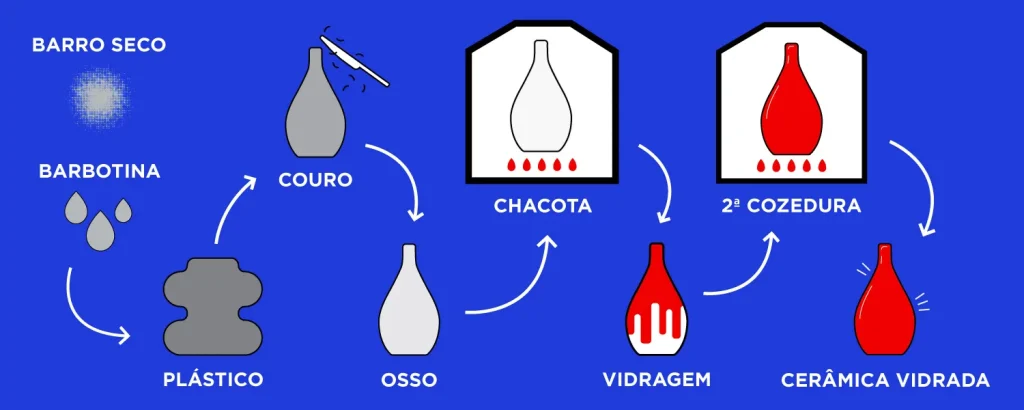
Clay can be divided into 6 to 7 main stages, depending on how they are grouped.
Although not all of these points correspond to “stages of clay” in the strict sense, they are part of a continuous process of transformation. In this sense, we think it's useful to include the whole process, from the barbotine to the final piece.
The stages of clay
To understand the process of transforming clay, it's important to look at each stage. Below, we describe each of the phases of clay and identify their characteristics, so you can understand what to do, what to avoid and how to recognize the right point.
Dry clay (powder)
Dry clay, usually in powder form, is the raw material used to create plastic clay when mixed with water.
It can be ordinary clay that has lost all its moisture, in pieces or ground up, and when rehydrated it becomes moldable again. Although some stages of the process are irreversible, it is possible to go back as far as the bone stage. In practice, this means that if you've built a piece that has already evolved to bone but you've decided not to bake it, it's still possible to take the material back and recycle the clay.
It can also be crushed to prepare barbotine, combining it with the appropriate additives.
What to do at this stage?
Add water to form a plastic paste.
What to avoid?
Add excess water.
How do I know the right spot?
Until it forms a uniform, homogeneous paste. No hard, dry parts, but not too liquid.
Barbotine
Barbotine is a liquid clay mixture, ideal for filling molds or gluing parts together. There is also powdered barbotine, prepared to be diluted in water, producing a ready-to-use liquid barbotine.
In English, the term slip refers generically to liquid clay, used both for molds (slip casting) or for decorating or joining pieces (when thicker).
In Portuguese, we can differentiate between barbotina and lambugem:
Barbotine - more fluid, used mainly for filling molds, with the addition of a deflocculant.
Licking - thicker, used to glue parts together or reinforce joints.
Plastic
The plastic stage is when the paste still contains a large percentage of water, giving it malleability and flexibility. At this stage, it is possible to twist, join and make incisions without difficulty. Of all the stages of clay making, this is the ideal time to model by hand and shape the clay, either by making slabs or rolls, or by working on the potter's wheel. Everything must be done before the clay begins to dry out and lose its ability to be molded.
What to do at this stage?
Modeling, building, joining pieces, working on the wheel.
What to avoid?
Excessive handling, which dehydrates too much.
How do I know the right spot?
Malleable, it doesn't stick to your hands too much.
Leather
When the clay is leathery, it has lost some of its water and is firm, but still slightly moldable. It is at this stage that you can make precise cuts, apply engobes, assemble pieces with more stability or make engravings. It is also the ideal time to smooth and perfect the surface.
What to do at this stage?
Cutting, joining with precision, engraving, applying engobes, smoothing.
What to avoid?
Forcing joints or deforming the part.
How do I know the right spot?
Firm to the touch, but still allows clean cuts without breaking.
Between the plastic state and the bone, you can follow the color of the clay. As it loses water, the clay becomes less dark.
Bone
In the bone stage, the clay is completely dry and takes on a lighter color than in the previous stages. Due to exposure to air, it has lost most of its water and has acquired a hardness that no longer allows it to be twisted or deformed much. Of all the stages of clay, it is the most fragile and any impact can cause cracks or breaks.
Despite this, small adjustments can still be made: the surface can be sanded or touched up to correct details before the first firing. At this stage, the clay is ready to move on to the next stage, maintaining its defined shape.
What to do at this stage?
Sanding, correcting small details before baking.
If you don't want to bake it, you can recycle it and turn it back into plastic.
What to avoid?
This state is very fragile, so avoid pressure and transport very carefully.
How do I know the right spot?
Lighter color, room temperature (not cold to the touch), no visible moisture. It has lost all its water, which makes it the safest state for the first cooking.
Joke
After the first firing, the clay turns into chacota, a more resistant, porous and stable material. This phase is essential for applying glazes, as the porosity of the chacota allows the glaze to be absorbed evenly, guaranteeing a homogeneous covering before the second firing.
Firing marks the beginning of an irreversible transformation in the stages of the clay. The piece can no longer return to its plastic state, but is ready to receive the final finishes that will define glazed ceramics.
What to do at this stage?
Apply glazes and other decorative coatings such as ceramic mines.
What to avoid?
Some people apply engobe at this stage. However, we recommend applying it at the leather stage.
How do I know the right spot?
If the cooking process has gone as intended, you're in trouble. Rigid, porous and absorbent.
Glazing and 2nd cooking
To reach the final stage, a glaze must be applied to the clay and fused in a specific ceramic kiln, known as a muffle kiln. The type of glaze and the firing temperature are directly related to the characteristics of the clay, so it is essential to carefully follow the technical instructions for each material.
This stage permanently transforms the piece. The glaze “bonds” to the shellac, creating a uniform and soon waterproof surface.
Glazing
What to do at this stage?
Apply by dipping, brushing or spraying.
What to avoid?
Irregularities or too thick a layer. Glaze on the base of the piece.
How do I know the right spot?
Uniform, without gaps or drips
2nd cooking
What to do at this stage?
Follow the technical instructions for firing the glaze.
What to avoid?
Unsuitable temperatures or cooking curves.
There are more details about baking here ➔ Ceramic firing: What happens to the clay in the muffle?
Glazed ceramics
After the second firing, the piece has a non-porous surface. The glaze forms a glassy layer that can be glossy, matt, opaque or transparent, protecting the piece and making it waterproof.
In addition to its practical function, the glaze defines the aesthetic finish and, depending on the type chosen, can make the piece safe for food use. This is the stage that completes the clay's journey, transforming it from raw material into functional and durable ceramics.
What to do at this stage?
After the 2nd cooking, the piece is ready to use.
What to avoid?
Shocks and falls. Ceramic is resistant, but not indestructible
How do I know the right spot?
Continuous vitreous surface, with no visible porous areas (except on the base/fridge or in areas you haven't glazed)
And after the glazed ceramic?
In the previous phase, we indicated that this was the end of the clay stages. And, in fact, this is how most ceramic processes end. However, we can still continue the transformation process, especially for decorative purposes.
There are decorative coatings that can be applied to already glazed ceramics, which require a third firing. This is the case with ceramic decals, a foil coating, often screen-printed, applied to the vitreous surface created by the glaze. After application, the piece undergoes a third firing, which fixes the design to the surface.
Third-fire paints also make it possible to add decoration after the second firing. These are vitrifiable paints, specifically for decorating glazes, which fuse together in a third firing.
Finally, still on processes involving third firings, there are metallized finishes, better known as lustrines. These coatings, typically based on gold, silver or copper, are applied to the already glazed ceramic and fixed with a third firing. The result is a thin metallic layer that gives the piece its characteristic shine.
Why it's important to know the stages of clay
Knowing the stages of clay allows us to understand that clay has a complex path, with its own states and a long journey.
It is essential to be aware that the clay must evolve naturally and carefully between each stage. An essential part of the process is respecting the time that some states have.
Knowing the stages of clay allows you to understand the right moments to intervene or avoid mistakes.
Throughout the process, small variations in humidity, time or temperature can alter the result. Knowing what stage the clay is in, especially between plastic and bone, helps you anticipate behavior and make better decisions.
More than a sequence of stages, this is a continuous process of transformation, in which each phase prepares the next. Understanding this path is essential to working with clay in a conscious and consistent way.
Ceramics Workshop
4 sessions | 11 hours in total
It is the most complete route for those who want to understand the process from end to end, from the plastic clay to the glazing process.
Frequently asked questions about the stages of clay
How many stages does the clay have?
The phases of clay can be divided into 6 to 7 phases. Here we have identified 7 phases: dry clay, slip, plastic/wet clay, leather hard, bone dry, bisque and glazeware.
What is the ideal stage for modeling by hand or on the wheel?
Of all the stages of clay, the ideal stage for modeling clay, whether by hand or on a potter's wheel, is the plastic stage. In this state the clay contains a lot of water, making it malleable and flexible, allowing it to be modeled easily before it dries.
Is it possible to recycle clay?
Yes, it is possible to recycle clay. Up to the bone stage, it is possible to revert to the initial stages and resume the cycle. The first firing is irreversible and it is not possible to recycle and have clay again.
When is the clay ready for its first firing?
Your piece is ready for firing as soon as the clay loses all its water. From the plastic phase onwards, the clay loses water and becomes less and less dark. When the color becomes lighter and is not cold to the touch, it is ready for the first firing.